Transfer Case Yoke and Seal Replacement
TM 9-2320-363-34-1 · Chapter 3 — Power Package Maintenance
This task covers:      a. Removal     b. Cleaning    c. Inspection d. Repair         e. Installation

Applicable Configuration:                                Equipment Description:

All except M915A2                                        Reference               Condition Description

Tools and Special Equipment:                            TM 9-2320-363-20         Driveline Removed

Shop Equipment, SC 4910-95CL-A31                        TM 9-2320-363-20         Transfer Case Oil Drained
Tool Kit, SC 5180-90-CL-N05
                                                         General Safety Instructions:
Materials/Parts:

Seal, Oil              P/N 55079AX                                          WARNING
                                                          Adhesives, solvents, and sealing compounds
Grease,                Appendix B, Item 26                can burn easily, can give off harmful vapors,
Automotive and                                            and are harmful to skin and clothing. To avoid
Artillery (GAA)                                           injury or death, keep away from open fire and
                                                          use in well-ventilated area. If adhesive, solvent,
Adhesive-Sealant,      Appendix B, Item 3
                                                          or sealing compound gets on skin or clothing,
Silicone
                                                          wash immediately with soap and water.
References:

TM 9-2320-363-20

                                                NOTE
                            Procedure is the same for all yokes and oil seals.

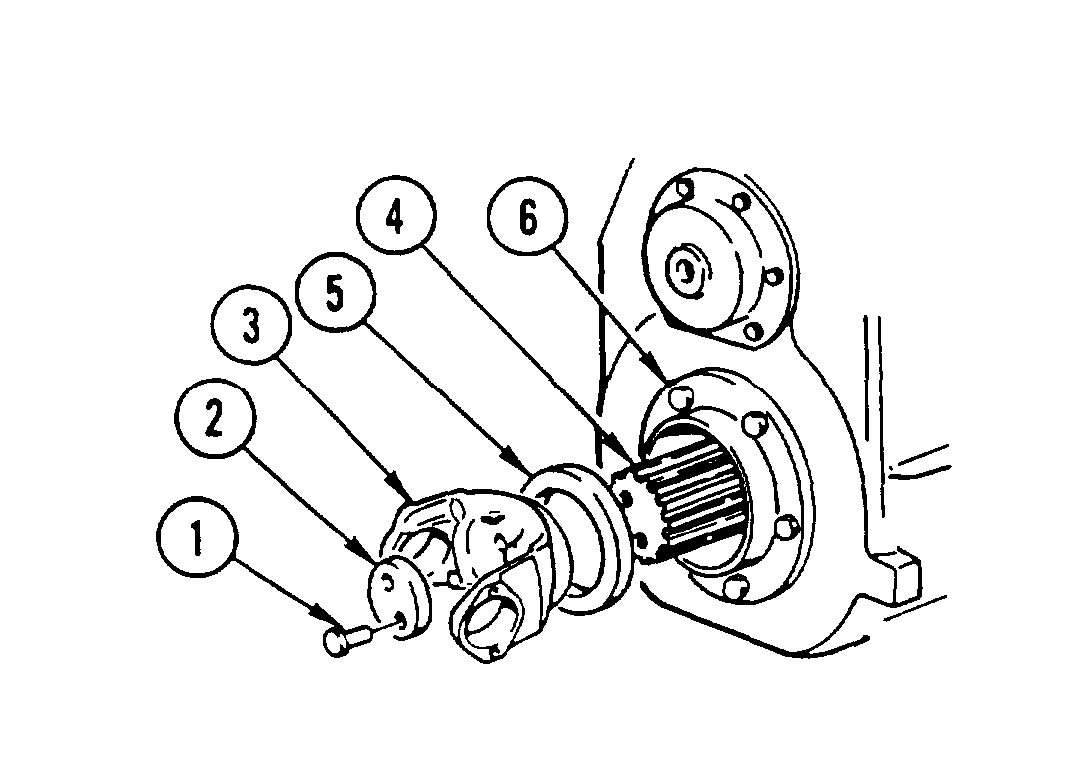
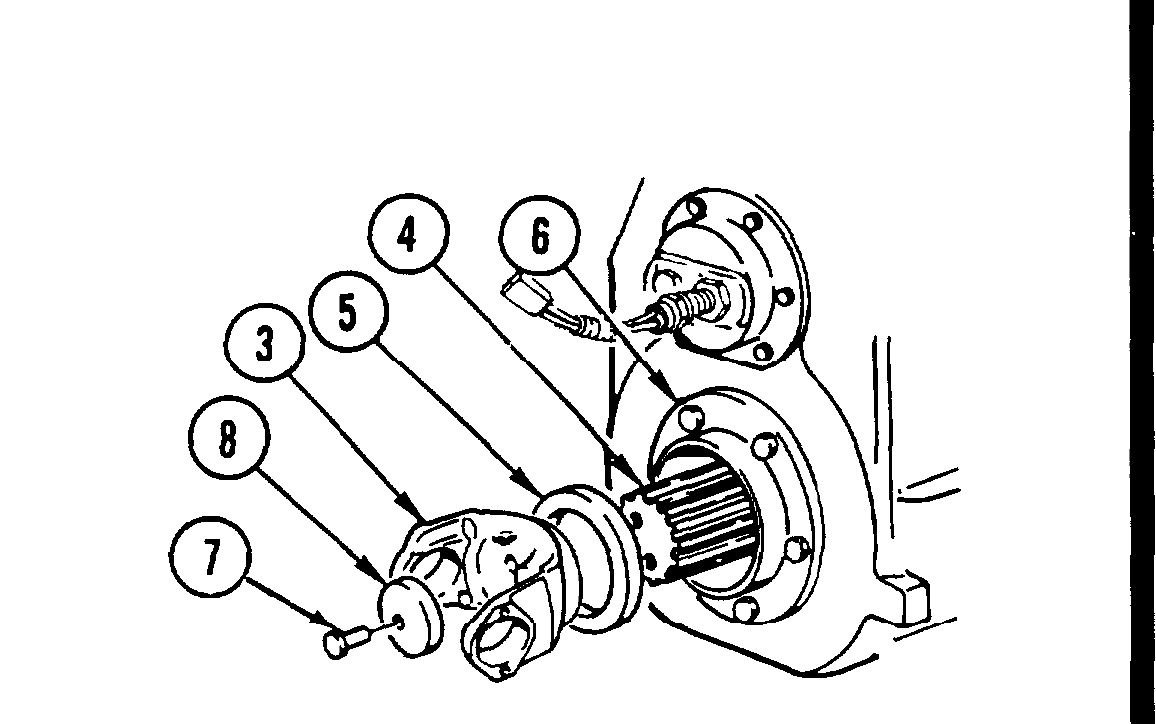
1.      REMOVE TWO SCREWS (1) AND LOCK PLATE (2) OR ONE SCREW (7) AND LOCK PLATE (8).

2.      REMOVE YOKE (3) FROM SHAFT (4).

3.      REMOVE AND DISCARD OIL SEAL (5) FROM BEARING CAP (6).

        Use general cleaning methods to clean all parts (page 2-30).

        Inspect all parts for wear or damage.
TM page Change 1 3-275
Use general repair methods to repair damaged parts (page 2-33).
M916A1 M916A2, M917A1, AND M917A1 w/MCS
1. COAT LIP OF NEW OIL SEAL (5) WITH GREASE
2. INSTALL OIL SEAL (5) IN BEARING CAP (6).
WARNING Adhesives, solvents, and sealing compounds can burn easily, can give off harmful vapors, and are harmful to skin and clothing. To avoid injury or death, keep away from open fire and use in well-ventilated area. If adhesive, solvent, or sealing compound gets on skin or clothing, wash immediately with soap and water.
3. COAT END OF SHAFT (4) WITH SILICONE ADHESIVE-SEALANT.
4. INSTALL AND SEAT YOKE (3) ON SHAFT (4).
5. INSTALL LOCK PLATE (2) AND TWO SCREWS (1). TIGHTEN SCREWS TO 60 LB-FT (81 N.m).
6. INSTALL LOCK PLATE (8) AND ONE SCREW (7). TIGHTEN SCREW TO 308 LB-FT (418 N.m).
NOTE Follow-on Maintenance:
Fill transfer case with oil (TM 9-2320-363-20). Install driveline (TM 9-2320-363-20).
TM page 3-276 Change 1